Showing posts with label Cake. Show all posts

Tuesday, January 8, 2013

Flip Flop Cupcakes

     I made these cupcakes by dipping the frosted cakes in brown sugar for the sand and making individual fondant flip flops and men’s leather sandals.  The event was a kick off party before taking a catamaran cruise around the British Virgin Islands.

Flip Flop Cupcakes 001

I have to give credit for the pink flip flop idea to Elisa Strauss.  She is the inspiration for so much of what I attempt.


                              IMG_0631

Friday, March 6, 2009

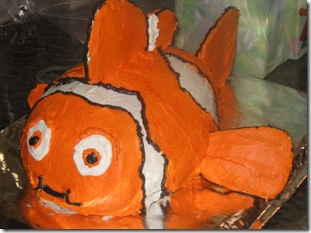
Nemo Cake

For my son’s 2nd birthday party we had a “Finding Nemo” swimming party.  The inspiration for the cake was a very large stuffed animal that looked like Nemo.  This was my very first attempt at a 3D cake.  Up till this time, I had only done one dimensional cakes.

              visiting 027

For this cake I used a football cake mold to get close to the correct form.  Right now the eyes are crackin’ me up.  I don’t think I captured the correct shape.  Poor Nemo looks like he is in a trance.

     cole under 3 231

I cut the fins out of cardboard, covered them in foil and frosted them.  For these types of elements I use wooden skewers that I attach to the object I need to connect to the cake body.

                cole under 3 232

In retrospect, I have to wonder how traumatizing it may have been for my little guy to see his favorite Disney character hacked to pieces and eaten.  I guess we will just have to wait and see as the years progress.

This was in 2004.

R2-D2 Cake

I have to confess that this is one of my favorite cakes.  I was brainstorming a Star Wars theme birthday cake for my son’s 4th birthday.  My dad had this great idea that I should try an R2-D2 cake.  So, that is what I did.  He gets credit for the idea, I get credit for the construction.  But, it was our team work that made this cake happen.

DSC_0119

This was in 2006 and I would call myself a “Super Novice” at that time.  I am still a novice today (2009) and I am considering taking a cake decorating class.  Wow, what a concept.  I bet they would be able to teach me all kinds of tricks to make everything look better.

The Process

 DSC_0099

The bottom of the cake wrapped in foil is Styrofoam to add light weight height and stability.  The top portion (dome) is from a soccer ball cake mold.

               DSC_0107

         The legs were made from rice crispy treats.

DSC_0113

The cake is beginning to take shape! This might just work.

                                     DSC_0114

             Add the blue frosting and attach the legs.

DSC_0141

Black frosting for the finer details.

                                                  DSC_0121

DSC_0118

           Voila!  Finished product.

  DSC_0138

This blog post is in loving memory of my dad.  Without his confidence in me, I may never have attempted this R2-D2 cake.  I miss you dad.

Thursday, March 5, 2009

Spiderman Cake / Downtown

For my son’s 5th birthday he was all about Spiderman.  I knew that I had to make something for that.  I just couldn’t come up with anything I liked for Spiderman himself.  I am not a fan of “flat” cakes.. you know, one level.  I like tall cakes… you know more than one level.  So, I had a dilemma on this one.  One day we were watching Spiderman – the movie.  I watched as Spidy swung from building to building… and BAM!  Just like that, I thought “I will do a downtown scene with Spiderman going from building to building.”  The logistics of having him swinging across the city was tougher than I thought it would be and it was going to require 2 separate cake structures, ugh.  Slight change of plans. Instead, I was lucky enough to find a great Spiderman candle that I perched atop my building as if to be watching the crime below.

The Result

DSC_0390

We (by that, I mean my husband) made a city street around the cake with cars and emergency vehicles.  In person, this looked much more fun.  Wish you could have been there.

Here are a few more pictures.

DSC_0305

You can see by looking here that the roof tops were on a separate board.  I put the top on when we got to the party, then piped in some filler frosting to bind the top of the buildings with the body of the buildings.

                    DSC_0307


DSC_0318

Little known fact:  I use Styrofoam in the bottom half of these tall cakes.  It helps with stability and weight.  Also, it saves me from having to make 4-6 more box cakes to get the desired height.

                   DSC_0319

A little topsie turvie… I know.  But fun, which is the goal.

Wednesday, March 4, 2009

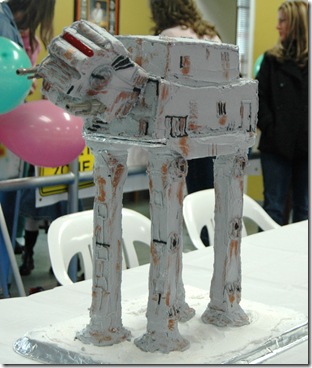
Star Wars At-At Walker Cake

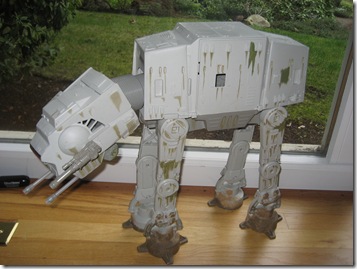
For my son's 6th birthday party we decided on a "Jedi Training Camp" theme. So I asked Cole (my son) what he wanted his birthday cake to look like this year. He boldly asked for an AT AT walker cake.    ooooookay …Really?! Is that what you want? Are you sure? For those of you who are not captivated by the Star Wars series, here is a photo of an AT AT Walker.
AT AT Walker 005 

Ok.... let's see. I need to make this thing into a cake. Right.... Let the brainstorming begin.  By golly, I think I’ve got it!

The Process

Fall 2007- May 2008 190

I bought 4 - 12” cake pillars because they make great legs.  In this case, I covered them in foil to make clean up easier.  I was going to be using a Crisco/powdered sugar frosting. 

             Fall 2007- May 2008 196

I used an old car cake mold I had laying around for the chocolate top (which I sculpted into the correct shape) and a 12 x 12 cake pan for the yellow cake.  I ended up cutting the yellow cake in half and stacked it.  I also cut out a cardboard base for the underside of the cake (seen covered in foil down in the left corner).

Fall 2007- May 2008 199

Body- Lots and Lots of gray frosting…. interesting.
             Fall 2007- May 2008 201

The head was carved from a Styrofoam cube.  It had to be light weight because I needed it to attach to the front of the body.

Fall 2007- May 2008 200 

I glued the legs to the tray with rubber cement so they would not slip.

                  Fall 2007- May 2008 210

                          I used the guns off of Cole’s at at walker.

Fall 2007- May 2008 211

I used bronze luster dust and a small paint brush to make the “rusty metal” appearance.

The Result
Fall 2007- May 2008 213

We transported the cake in 3 sections to the party. Some assembly required.
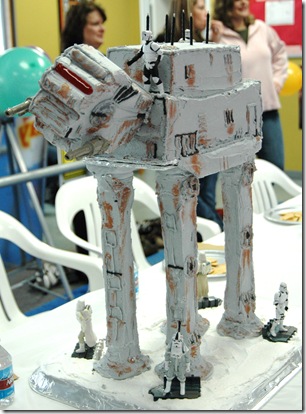
                      Fall 2007- May 2008 239

I placed some of the action figures around the feet and on top of the at at walker.

                     What a great day!

Fall 2007- May 2008 247

Friday, February 27, 2009

Grand Piano Cake

I was asked about a month ago to assist with my dear friend Carol’s surprise birthday party.  I was pretty excited at the thought of getting to make a cake… you see, making fun cakes is what I am becoming known for.  Note: I said “fun” cakes not “great cakes” or “awesome cakes” or “beautiful cakes”.

In brainstorming this cake, I had to think of what might represent Carol the best that could also be edible.  That took me back about 3 years ago when I first met Carol.  She was leading worship in our little church.  You should have seen her… she has these blue eyes that just sparkle (especially when she sings about our Lord).  She had one hand on the piano, one hand on the keyboard and she was singing into her microphone!  I thought to myself “I wonder if she had symbols strapped to her knees under that piano too!”

So, I made the decision to make her a grand piano cake.

IMG_2781


The Process

IMG_2743

4 box cakes (with pudding in the mix)

                        IMG_2744

3 cake pillar legs and a custom reinforced cardboard cut out in the shape of the piano.  I also used a clear glass cutting board with this cake because I was scared to cut into it with only 3 legs.  Everything worked out well.

IMG_2746

I used gum paste (which I dyed) to make the keys, sheet music holder and wrapped some around the legs.

IMG_2751

I frosted with chocolate butter cream.  It was my first time using that type of frosting.  It went pretty well as far as spreading went.  By the time we ate the cake it had hardened a little.  It still tasted good and the cake was moist and delicious.

IMG_2750 

I moved the cake onto its legs and there you have it.  A chocolate butter cream grand piano cake.  It was so cute when it was finished that I almost gave it a name and kept it as a pet.


IMG_2752

Friday, February 20, 2009

X-BOX 360 Cake

Let the Games Begin!

This year I was inspired to make my son an x-box cake for his birthday. I really wanted to try my hand at fondant this time. I thought the 360 with it's white smooth surface would give me some advantage for my first try.


I was really pleased with the end result. Although the scale was a bit off, the spirit of the cake was captured for sure. Some of my favorite details of the cake were the knobs on the controllers which I molded with gum paste, and the venting in the console on the top and sides which I made using a meat thermometer (wired, I know... but just the right tool). Oh, I also really liked how the power button turned out. I used store bought green gel from the cake section.

I will caution you that one of the unexpected side effects of making this cake is now when I play x-box I have an almost uncontrollable urge to lick my controller.

Cake Specs: 5 box cakes with pudding in the mix (1 box for controllers and 4 boxes for console), 4 lbs of my favorie store bought fondant (Home Cake in Seattle) a bit of gum paste, black food coloring, dark chocolate M&M's and about 9 hours (including baking time).

My sister in law Jenny posted these pictures on her blog www.jennyonthespot.com and I am so grateful to her because my pictures didn't turn out very good. Thanks Jeanie!

Check back for more of Ace of "Kerry" creations!